Install
Installation
Your SST Guards include a Clip Installation Option and an Iron-On Velcro Kit Option to easily insert and remove the guards while not in use.
* Before installing SST Head Guards, please check to see if your FlexFit hat has a single nylon stitch in the liner of the hat that connects the liner and the side of the hat. The stitch will be located approximately where the ear would be and can prevent the guards from being installed all the way down inside the hat liner. This stitch should be cut and will in no way affect the functionality of the hat.
SST Clip Installation Option
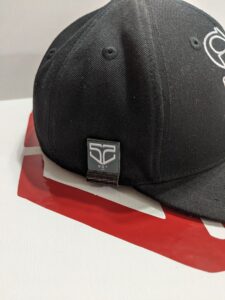
Place the SST Guard inside the liner, along the same side of the head as the Pitcher’s throwing arm. The guard should provide protective coverage from just outside of the logo in the front of the hat to just behind the tip of the ear. Once the guard is in place, gently push the SST Clip on so that it sandwiches the hat and guard together. Some slight bending of the clip may be required, just be careful not to bend too much as it may snap. We recommend that Clip placement be in between the end of the hat bill and the ear.
Velcro Kit Installation Instructions
1. Each SST Head Guard Comes with a custom Velcro Kit that provides secure installation inside the hat, preventing guard movement during use. Each Kit includes:
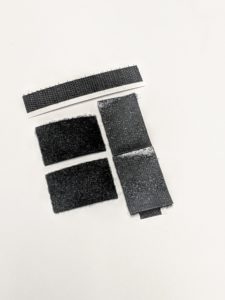
1 complete Velcro Kit for installing a Dual Sided Set (2 Guards)
(2) 3″ x 1″ Iron-on Loop Patches
(1) 3″ x .5″ Peel and Stick Hook Strip
2. Make sure your SST Head Guard(s) are clean and dry. Peel the backing from the 3″ x .5″ Velcro strip and place along the bottom outer edge of the SST Head Guard.
3. The placement for the 3″ x 1″ Iron-on Loop Patch can vary based on the type of guard you purchased. Just be sure to place the Loop Patch inside the hat where it will meet the Hook Strip on the guard. You may use one or both patches included with each guard. Installing both patches included with each SST Guard will provide the most secure installation but one patch works as well.
4. Turn your iron to highest heat setting recommended for the type of fabric the hat is made with and activate the steam option.
-
Make sure the Loop Patch is placed where you want it inside the hat liner and that it faces where it will meet the Hook Strip.
-
Use a cotton cloth or similar piece of fabric to cover your hat. This will help protect the hat from being damaged by the iron.
-
With the Loop Patch and protective cloth covering the outside of the hat, place the iron on top of the protective cloth and Loop Patch. Use firm pressure and move the iron slightly back and forth for 60-90 seconds.
-
Allow the hat to cool for a few minutes and then check that the Loop Patch has been securely bonded with the hat.
-
If any part of the Loop Patch, especially the corners, is not attached to the hat, apply the iron for an additional 30-60 seconds.
-
Repeat the process for all desired Loop Patches.
-
Your hat is now ready for secure SST Head Guard installation.
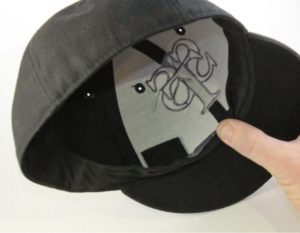
Sample Loop Patch installation. Location of the this Loop Patch will vary.


